
Background
I recently had the challenge of having to create a synchronous extract from a source system that couldn’t offer its data by direct means, instead exporting on demand.
I wanted to investigate the capabilities of Microsoft Fabric to do this but had certain challenges in getting my hands on an environment in which to do so.
The Webhook Activity is one way of successfully processing activities synchronously within Azure Data Platforms. There are more options to explore, such as authentication and ouptut messaging but its fairly straightforward to use and setup and hopefully this guide goes some way to helping others as well.
N.B although this guide is using Data Factory, the steps will translate to Microsoft Fabric and Azure Synapse.
Webhooks In a Nutshell
Often referred to as reverse APIs, webhooks are a method used in web development to enable realtime communication between different applications. In the case of Data Engineering pipelines, they can be used when synchronous processing of a pipeline or activity is required.
When an event occurs in the source application (e.g a new comment), it triggers an HTTP request to a predefined URL in the destination application.

Simulating a Webhook Scenario In Azure
Using components in Azure, it is possible to setup your own scenario to test against and you will need
- 1 x Storage account with hierarchical namespace enabled.
- 1 x Logic App (I chose the consumption model).
- 1 x Data Factory.
Setup Storage
In your storage account, create a container (in this case, named test) and within the container, create two folders :
- SourceBucket – represents the location where the source system will place its output.
- DataPlatformBucket – represents the final resting place of the data within the data platform.

Setup The Listener
In this case, the listener takes the form of an Azure Logic App
The whole Logic App looks like this, the delays are optional but help to illustrate the wait time within the pipellines.

Create a trigger for an HTTP Request. Once you save the Logic App, a URL will be generated. You’ll need this later.

For convenience, parse the body of the request. The callBackUri value is always sent via the Webhook Activity. I have included the Blobname as a custom property that I will include in my Data Factory.

Setup the Create Blob step. This is as simple as connecting to the chosen storage account and specifying a folder path.

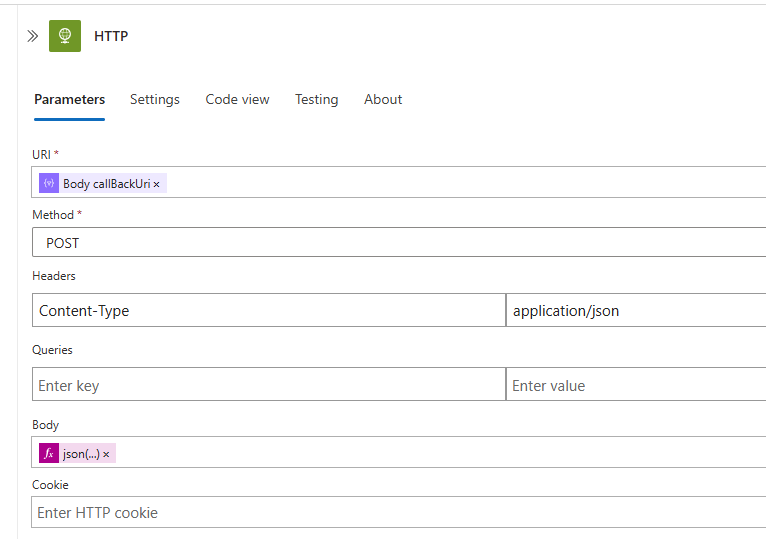
Finally setup an HTTP step, once the ‘work’ is complete, we will call the webhook URI originally passed from the caller. You will need to construct a suitable body – here is my hastily put together expression.
json(concat('{'
, '"BlobName":'
, '"'
, body('Parse_JSON')?['Blobname']
, '"'
, '}'))
Once complete, the Logic App is now waiting for something to call it before it does its work.
Create The Data Factory Dataset
As we are using Data Factory, we need to create a Dataset. This has two Parameters for the BlobName and FolderName so we can use the one dataset dynamically.

Create The Pipeline
Add a single parameter to the pipeline, this is simply so we can test with different filenames.

Add a Webhook Activity to the canvas and setup as per the below image
- The URL is the URL you copied once you created the Logic App.
- Again the body expression is provided here.
@json(concat('{',
'"Blobname"', ':',
'"',  pipeline().parameters.PARAM_BlobName, '"',
'}'
))
Next Add a Copy Activity to the canvas and setup as follows
- The Blobname is set to use the Parameter Value

The sink is fairly straightforward, just the folder name has changed.

Running The Test
If you have things setup as above
- Your storage folders are empty.
- Your Logic app is waiting for something to call it.
When you run the Pipeline
- The Webhook activity will send a request to your Logic App, this will include the CallBackUrl property.
- The Logic app will ‘do its work’, which in this case is creating a blob in the source folder. In the real world this could take a few or many minutes.
- The Logic app will call the CallBackUrl to tell the pipeline it has ‘done its work’
- The pipeline will continue
Lets test the pipeline, we’ll give it a parameter of WebHookTesting.blob

The logic app does its work and creates the blob, you will notice the Webhook activity continues to run. After a delay of 5 seconds, the Callback URL is accessed and the pipeline continues.

Control is passed back to the pipeline and the copy can continue.

Behind The Scenes
Taking a look behind the scenes and we can see what is happening
The input for the webhook Activity does not suggest the CallBack Url is being sent.

But looking into the Logic App, we can see it is being sent to the Logic App okay.

Further Work
We are also using the Pipeline parameter value for the blobname for simplicity, but looking at the output of the Webhook activity we can see the LogicApp passes this value back as well so this test can easily be extended with more automation and dynamism.
